

Send event communication emails in Slidecrew by scheduling an email campaign. Each campaign sends one email template to the speakers or moderators you choose.
Short answer: Choose a template, recipient roles and any filters, then review the planned recipients before saving. When you save, Slidecrew schedules the campaign. If the sending time is now or in the past, Slidecrew starts sending immediately. You can later edit a scheduled campaign or cancel it, but cancellation is permanent and you cannot pause a campaign.
Set up and schedule a campaign
Each campaign uses one email template for the recipients you choose and the sending time you set.
- Navigate to Event → Email Campaigns, then open the Email Campaigns tab.
- Click the add button at the top right of the table or below it. In the New Campaign pop-up, select a template from the Template dropdown. The pop-up has Email Campaign and Statistics Dashboard tabs.
- Enter a Campaign Name and set the Sending Time (your timezone). The event timezone time appears beside it.
- Under Send Email to, select one or more roles: Moderator, Speaker, Presentation Submitter or ePoster Submitter. A recipient with more than one selected role still receives only one email.
- Apply any speaker send filters or custom data filters.
- Open the Statistics Dashboard tab and check the planned recipients before saving. The summary shows recipient totals, pending recipients and people with no email address. Then click Save to schedule the campaign.
Choose who receives the email
Choose recipient roles and filters to set who receives the campaign. The Selected Recipients area shows a total for each role and a unique-recipient total; people selected under more than one role receive one email.
These speaker send filters work on files and forms. Skip uploaded can be used to remind speakers who have not uploaded, and Publish Unknown to remind speakers who have not set a publish permission:
| Filter | Filter effect |
|---|---|
| Skip “No files” | Skips speakers who are only assigned to presentations of the “No Files” type. If a speaker has normal as well as No Files type presentations, they will still receive the email. |
| Skip uploaded | Skip speakers who have already uploaded at least one file |
| Publish Unknown | Send to speakers who have not set a publish permission on at least one file |
| No Disclosure Slide | Speakers whose files have no disclosure slide detected |
| Missing Form | Speakers with at least one outstanding form |
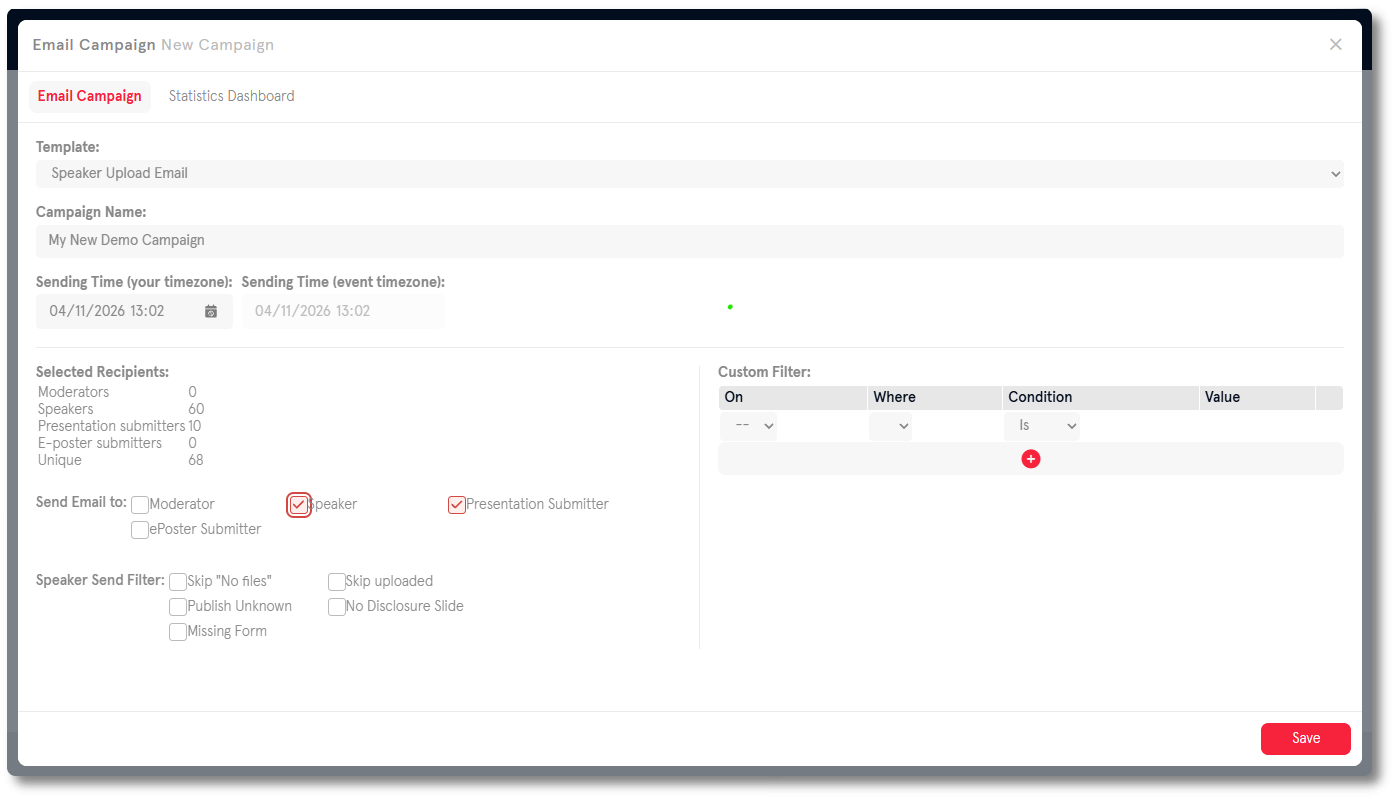
You can also filter by custom data. Create the fields in the event first. The Custom Filter table is on the right of the Email Campaign tab. Click its red plus button to add a row. Each row uses On to choose Person, Presentation, Session, File or Room data, Where to select a field, Condition to choose Is or Is Not, and Value to choose an existing value for that field. Add more rows if needed, or click the bin icon at the end of a row to remove it. Then check the planned recipients on the Statistics Dashboard tab.
Edit or stop a scheduled campaign
You can edit a scheduled campaign and save the changes, but you cannot change its template after scheduling. You can no longer edit a sent or cancelled campaign. You cannot pause a campaign. Select Cancel to stop its remaining emails or Remove to remove a scheduled campaign that has not started sending. Both actions ask you to confirm. Cancellation is permanent: you cannot restart the campaign.
Check campaign results
The Sending Status column shows campaign progress. Open a campaign and select Statistics Dashboard to see each recipient’s status, send time and any error. Recipient statuses show the latest tracked interaction:
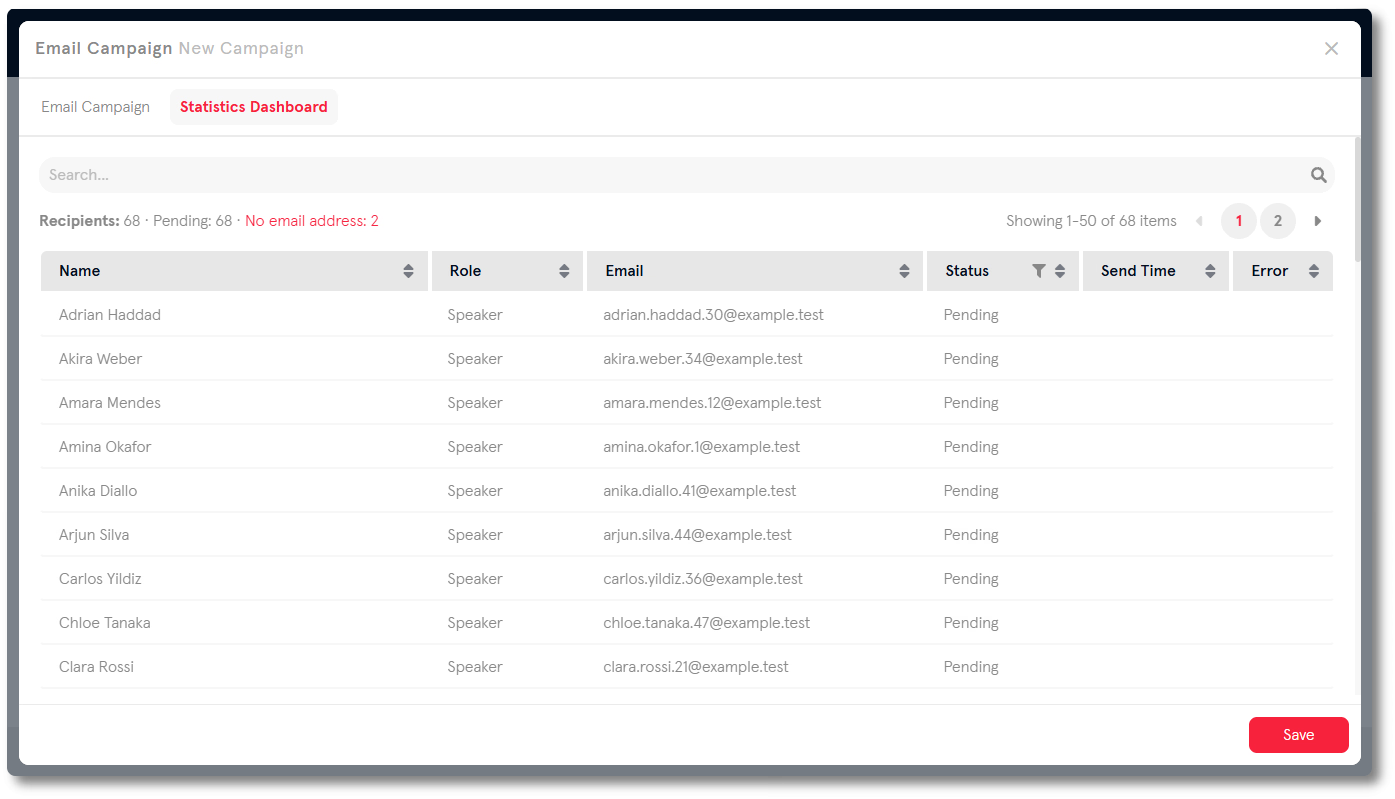
| Column | What it shows |
|---|---|
| Name | Recipient name |
| Role | The role that included the person in the campaign |
| Recipient email address | |
| Status | Pending before sending, followed by the latest tracked campaign status |
| Send Time | When the email was sent. This is blank while the campaign is still planned |
| Error | Error detail if the email could not be sent |
| Status | What it means |
|---|---|
| Pending | The email has not been sent yet |
| Sent | The email was delivered to the recipient’s inbox |
| Opened | The recipient opened the email. This is detected via a tracking pixel that loads when the email is viewed. Some email clients and security filters block tracking pixels, so the open count is an estimate rather than a precise figure |
| Clicked | The recipient clicked their upload link and the upload page loaded. This is the most reliable status, as it requires an active action from the recipient |
| Bounced | The email could not be delivered. This is typically because the email address is invalid or the recipient’s inbox rejected it |
| Missing Info | The email could not be sent because required information was missing. For example, no email address on the recipient’s account |
Send an email to one speaker
Search for the speaker in the Top Menu Search Bar and open their Speaker Overview Page. At the bottom of the left column, find Sent Emails and click Send Email. Choose a template, then click Send. These messages appear on the Email Campaigns tab in a campaign named Manually Send Emails.
Related guides
- Email templates, campaigns, and custom data filtering → PDF walkthrough of campaign setup and recipient filters
- How do I create a speaker email template with tags? → Create and manage the templates campaigns use
- Organiser Manual → Full reference for email campaigns and campaign results